CW Programs / Interfaces
SWISSLOG links with the following CW programs: CwType, CWGet, CW Skimmer, MRP40 and SDC Skimmer. CwType sends CW; CwGet, CW Skimmer and SDC Skimmer decode CW. MRP40 sends / decode CW. Swisslog also supports the K1EL WinKeyer interface.
-
WinKeyer, K1EL at www.hamcrafters.com
-
CWType and CWGet by Sergei Podstrigailo, UA9OSV at www.DXSoft.com.
-
CW Skimmer by Alex Shovkoplyas, VE3NEA at www.DXAtlas.com.
-
SDC Skimmer by Yuri Pavlov, UT4LW at https://www.lw-sdc.com/
-
MRP40 by Norbert Pieper at www.polar-electric.com/Morse/MRP40-EN/
CWType is FREE but CW Get, CW Skimmer, SDC Skimmer and MRP40 need registration.
Setup the CW interfaces
To set up the CW interfaces select the menu item Options | CW-Interface and then the program/interface you will be using:

In the next dialog you have to specify the directory in which CwType.Exe / CwGet.Exe / CWSkimmer.Exe / MRP40vxx.exe / SDC.exe are located. For SDC you need to set the TCP port to communicate with Swisslog. By default is port 7701.
If you select K1EL WinKeyer continue reading HERE.
NOTE: If you have not configured any CW decoder, the first time you press the
![]() button (located at
the bottom of the Add QSO window) Swisslog will prompt you to select the
program you will be using to decode CW. If you are not going to use any CW
Decoder program select "None".
button (located at
the bottom of the Add QSO window) Swisslog will prompt you to select the
program you will be using to decode CW. If you are not going to use any CW
Decoder program select "None".
IMPORTANT (CW Type / CW Get):
Current versions of CWType / CWGet don't install the configuration INI file in the program folder (as in first versions) but in the following locations:
-
Windows Vista and higher: C:\ProgramData\CWType (or CWGet)
-
Windows XP: C:\Documents and Settings\All Users\Program Data\CWType (or CWGet).
Swisslog will automatically use the default INI files located in the above folders. If not found will search in the program folder of these programs (for compatibility with older versions).
Activating the CW Interfaces
By pressing the
![]() button
(Ctrl+Alt+C or AltGr+C) in the Edit-QSO
window, the following interfaces will start automatically:
button
(Ctrl+Alt+C or AltGr+C) in the Edit-QSO
window, the following interfaces will start automatically:
-
The last selected and configured CW decoder, in case the programs is not running. If you have configured all or some decoders, you can switch to use one or another by selecting the preferred CW decoder in Options |CW - Interface then pressing OK. By placing the mouse cursor over the
 button a hint message
will show you which program will be activated. Button become green
showing the decoder program is on en linked:
button a hint message
will show you which program will be activated. Button become green
showing the decoder program is on en linked:

-
CW Type. Only if configured in the previous step and if you have selected Cw Get, CW Skimmer or SDC Skimmer. MRP40 allows transmission so CW Type is not needed.
When CW Type is launched a special toolbar is displayed in the QSO-Edit Window to trigger CW Type macros. This toolbar is only visible while CW Type is running and hides automatically when CW Type is closed. It contains:
-
12 Buttons which send macro 1 thru 12 when pressed (Shift+Ctrl+F1-F12).
-
a drop down list with all 36 available macros. Select a macro and double-click to send it.
-
a TX-Button to start or stop the transmission (Shift+Ctrl+T).
-
a Pause button which pauses or restarts the transmission (Shift+Ctrl+P).
-
CW Type button: this button forces CW Type to restart (mandatory if you have changed macros in Swisslog to reflect changes in CW Type).

Macros
With Macros you can define the texts and the SWISSLOG fields which should be transmitted by pressing one of the macro buttons.
SWISSLOG stores the following fields for the use as ~[iField] or `[iField] in Macros: (see CwType Help)
- Call: callsign of partner station (callsign of the QSO window)
- Name: name of the operator (Operator
of the QSO window) - RSTS: RST sent (RSTS im QSO window)
- RSTSNR: RST_Nr sent (RSTSNr
of the QSO window) - RSTR: RST received (RSTR
of the QSO window) - RSTRNR: RST_Nr received (RSTRNr
of the QSO window) - MySerial: Call sign of the SWISSLOG license owner
- MyCall: Call sign used at current QTH
- MyName: Name used at current QTH
- MyQTH: QTH used at current QTH
- MyQTHLocator: QTH-Locator of the current QTH
- MyRig: Rig used at current QTH
- MyAntenna: Antenna used at current QTH
- MyPower: Power used at current QTH
This is an example I used for tests:
[Cw_Macros]
Macro0="Macro0"
Macro1="~[tx] cq cq de ~[iMyCall] ~[iMyCall] ~[iMyCall] cq cq de
~[iMyCall] ~[iMyCall] ~[iMyCall] ~[m11] "
Macro2="~[iCall] de ~[iMyCall]"
Macro3="~[m2] = ga dr om ~[iName] = tnx fr ur call = ur rst is ~[iRSTS]
~[iRSTS] ~[iRSTS] = "
Macro4="MY NAME IS ~[iMyName] ~[iMyName] ~[iMyName] = MY QTH IS
~[iMyQTH] ~[iMyQTH] ~[iMyQTH] = HW? "
Macro5="MY Conds are = Rig is ~[iMyRig] pwr is ~[imyPower] Ant is
~[iMyAntenna] =
Macro6="~[tx] cq cq de HB9BJS HB9BJS HB9BJS cq cq de HB9BJS HB9BJS
HB9BJS ~[m11] "
Macro7="~[ec] de HB9BJS"
Macro8="~[M7] = ga dr ~[en] = tnx fr ur call = ur rst is ~[esr] ~[esr]
~[er] = "
Macro9="MY NAME IS Walter Walter Walter = MY QTH IS Walenstadt
Walenstadt Walenstadt = HW? "
Macro10="~[fInfo_BJS.txt]"
Macro11=" pse k`[rx]"
Macro12="~[iCall] TU ~[lgs]"
Info-File "Info_BJS.txt", used in Macro10 :
~[M7] =
My pwr is 50 wts =
My ant is dipole =
`[ec] de Walter (
Working with CW Get
You can copy data directly from CwGet into the QSO window of SWISSLOG. To do this mark the text you want to copy in CwGet and then click to select into which field the marked text should be copied.

All logging actions (Save or Cancel QSO) must be done in Swisslog!
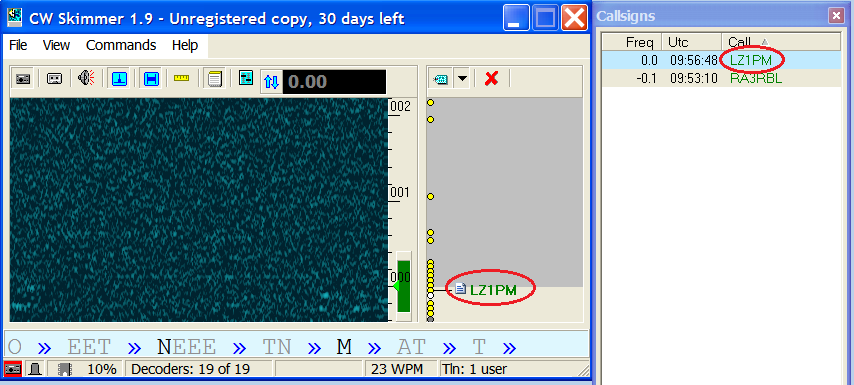
Working with CW Skimmer
Swisslog connects to CW Skimmer
via internal Telnet connection. User will know that it's correctly
connected to CW Skimmer when the
![]() button will become
green:
button will become
green:
![]() At the
right bottom part of CW Skimmer you will also see the following message:
Tln: 1 user. This indicates that one user (Swisslog) is
connected via Telnet to CW Skimmer.
If this don't happen, check that your antivirus/firewall is not blocking
outgoing/incoming connections of Swisslog and/or CW Skimmer.
At the
right bottom part of CW Skimmer you will also see the following message:
Tln: 1 user. This indicates that one user (Swisslog) is
connected via Telnet to CW Skimmer.
If this don't happen, check that your antivirus/firewall is not blocking
outgoing/incoming connections of Swisslog and/or CW Skimmer.
Swisslog will automatically activate the Telnet server of CW Skimmer in case it's not already activated by user (by default it's not activated). In case Swisslog can't activate it, it will display a message prompting user to do it manually.
You can copy data directly from CWSkimmer into the QSO window of SWISSLOG in two ways:
-
Clicking over the decoded callsign
-
Double-clicking on any callsign in the Callsign list
All logging actions (Save or Cancel QSO) must be done in Swisslog!
Working with SDC Skimmer
Swisslog connects to SDC Skimmer
via TCP connection. User will know that it's correctly connected to SDC Skimmer when the
![]() button will become
green:
button will become
green:
![]() If this don't happen, check that your antivirus/firewall is not blocking
outgoing/incoming connections of Swisslog and/or SDC Skimmer.
If this don't happen, check that your antivirus/firewall is not blocking
outgoing/incoming connections of Swisslog and/or SDC Skimmer.
You need to enable the TCP Server in SDC Skimmer. Enter the Skimmer setup and enable TCP Server at port 7701 (default port), or the port number you assigned previously in Swisslog, as highlighted in the screenshot below:

You can copy data directly from SDC Skimmer into the QSO window of SWISSLOG by clicking over the decoded callsign in the decoder window.
All logging actions (Save or Cancel QSO) must be done in Swisslog!
Working with MRP40
MRP40 doesn't send any info to external programs. When the link to MRP40 is activated, Swisslog is reading the Minilogbook.adif file from MRP40 every 10 seconds approximately, to check if there is a new QSO added. In such case it will read the QSO details and pass them to the QSO Entry window then saves the QSO.
Press the
![]() to activate
the link to MRP40. If MRP40 is not running, it will start automatically. The button will become
green to show Swisslog is monitoring MRP40 activity:
to activate
the link to MRP40. If MRP40 is not running, it will start automatically. The button will become
green to show Swisslog is monitoring MRP40 activity:
![]() . Press
the CW button if you need to deactivate the link (monitoring). Closing MRP40
will deactivate the link automatically and button will become red again.
. Press
the CW button if you need to deactivate the link (monitoring). Closing MRP40
will deactivate the link automatically and button will become red again.
In MRP40 go to Options > Show > Mini Log Book... to see the small Mini Log Book window:

Select with your mouse the decoded callsign in the lower part and automatically will be entered in the Call field. MRP40 doesn't have transceiver control, only a Band field. Before saving the QSO you need to know this:
-
If you fill out the Band field properly (i.e.: 80m, 20m, 10m, 6m, 70cm, etc ) then in Swisslog the QSO will be saved in the selected band. QRG will be set to the lower frequency assigned on band plan for CW in the selected band. Example: you set 160m in MRP40. The QSO will be saved in Swisslog on 160m, QRG 1810 which is the lower frequency defined for CW on 160m on the band plan.
-
If you leave the Band field blank (suggested), if transceiver control is started in Swisslog, then current frequency of your radio will be set. If transceiver control is not started or you don't use it, the band/QRG saved will be the one currently selected in the QSO Entry window.
When QSO is finished simply press the Save button in MRP40 and QSO will be automatically saved in Swisslog in about 10-15 seconds. IMPORTANT: If you are editing a QSO in Swisslog or Swisslog is logging another QSO sent by another program (i.e. WSJT-X, JTDX, FLDIGI, VarAC, etc), the QSO will be queued to be saved automatically after Swisslog finishes editing/saving. Pending Log requests number is displayed in the Swisslog main window title:
