Telnet and IRC Support
Introduction
Today more and more radio amateurs have a permanent connection to the internet and the internet has become an additional tool for many of us. Therefore I decided to integrate the Internet as seamlessly as possible into SWISSLOG and also added Telnet support.
Some may now ask the question: "Why the pain? There already are some very powerful programs available like DXTelnet and DXConcentrator which interface with SWISSLOG." There are a few reasons:
-
First of all: fun! I wanted to learn more about internet connections. The best way to achieve this is to write some programs; and so I decided to use SWISSLOG for my experiences.
-
The integration of basic internet functions can play an important role for many of you who do not want to interconnect with external programs.
-
There are more internet functions planned, like QSL-ing. With the basic internet functionality built-in SWISSLOG is well positioned to use these functions in the future.
SWISSLOG's Telnet support cannot directly compete with specialized programs such as DXTelnet or DXConcentrator. SWISSLOG implements the basic functions for Telnet support; those dedicated programs have many special features which SWISSLOG doesn't. So depending on your requirements you may want to use one of these programs (click on their names to go to their websites). With the SWISSLOG Telnet support there now is a new, easy way to connect to these programs.
Overview
SWISSLOG's Telnet support allows you to:
-
access an unlimited number of Telnet and IRC (Internet Relay Chat) servers simultaneously
-
automatically connect and reconnect to servers
-
extract DX and WWV messages received from all connected servers
-
run the connections in the 'background'. That means you don't need to have any windows open to monitor the DX and WWV spots
Quick Start
This section explains the basic steps to use the Telnet support. You find more information in the detail sections.
SWISSLOG's Telnet support is controlled by the Telnet Control window. Open it by selecting View ¦ Telnet Control Window from the Main menu.
The Telnet Control window looks like this :
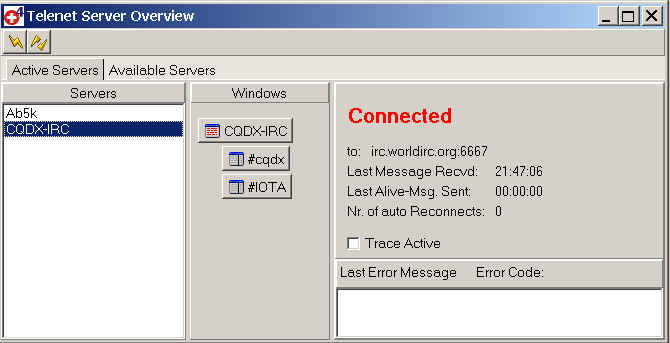
The Active Servers page (see example above) lists the servers you are connected to, or have been connected to but were disconnected.
-
If you select a server from the list, details about the connection are displayed:
-
in the middle "Windows" section of the window: buttons to open or switch to the server / channel window
-
on the right of the window: the connection status and - when available - the last error message
-
-
To remove a server from the Active Servers list press the Disconnect button

-
To re-connect a server press the Connect button
 . Note, that
SWISSLOG automatically tries to re-connect disconnected servers
. Note, that
SWISSLOG automatically tries to re-connect disconnected servers
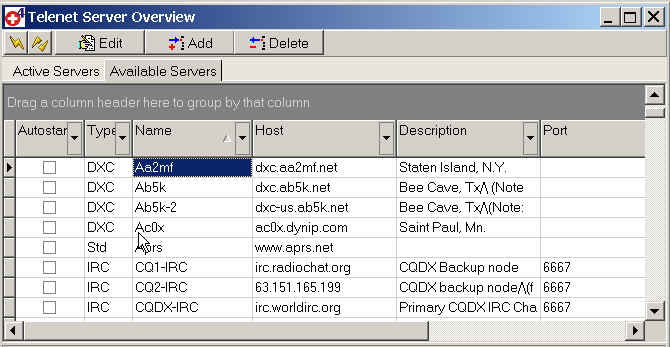
The Available Servers page (see example above) lists the servers you
can connect to. Select the server you want to connect to and press the
Connect ![]() button.
button.
Individual Server windows (see example below)
For each active server a window is available to monitor the traffic. These
windows are opened when you connect manually or when you press the window
button in the Active Servers list (example: ![]() ). The
layout of the window depends on the server type. Windows for telnet servers
which send DX-Spots (type = DXC) have a fixed number of tabs. For IRC
servers a separate window is available for each channel you joined.
). The
layout of the window depends on the server type. Windows for telnet servers
which send DX-Spots (type = DXC) have a fixed number of tabs. For IRC
servers a separate window is available for each channel you joined.
You can close the windows without disconnecting from the server and re-open them using the window buttons on the Active Servers list tab. SWISSLOG monitors the traffic even if the windows are closed. However when closing a window you lose all messages currently displayed.
Detailed Description
In this section you will find a detailed description of all telnet functions. If you just want to start a telnet connection read the Quick Start section. The following topics are covered in this section:
The Telnet Control window is the Control Center for the Telnet Connections. It allows you to:
-
Connect to servers
-
Disconnect from servers
-
Edit the server Properties
-
Control the server windows
You can open the Telnet Control window by either
selecting View ¦ Telnet Control Window from the main menu or
pressing Ctrl-T
The Telnet Control window looks like this :
The window contains two pages: the Available Servers page and the Active Servers page. A page is selected by clicking on the tab name.
The Available Servers list (see example above)
Here the servers you can connect to are listed. To be able to connect to a server some parameters must be defined. This page contains the functions to add, delete and edit the server entries (see Maintaining the Available Server list for details). But it is also the place you initiate the connection to a server.
Sorting, grouping and searching servers
Most features known from the Logbook-View are also available here:
Sort the list by clicking in the column header with the mouse. Ascending and descending toggle with each click.
Search incrementally by clicking in the data part of a column and then entering the search argument.
Select by pressing on the black arrow in the header and selecting the wanted entry from the list.
Group the rows by column values by dragging columns to the group panel.
Rearrange the columns by dragging them to the desired position.
Manually connect to a server
Select the server you want to connect to and press the Connect button
If you start a server manually the server window is opened automatically. You can then safely close the window because it is not needed for DX-Spot filtering. You can reopen a window from the Active Servers page.
Automatically connect at startup
You can start server connections automatically when SWISSLOG starts up. As soon as an internet connection is available SWISSLOG will connect to the servers which have the Auto Start flag set. SWISSLOG checks about every minute for a connection. So it may take some time until the connections are established. No windows will be opened for the automatically started servers. You can open the windows from the Active Servers page.
To automatically connect to servers at the startup of SWISSLOG set Auto Start to ON. To do this select the server you want and press the
button, or double-click the server name.
This action will open the Edit Server Configuration window:
In the Edit Server Configuration window check the "Start Automatically" box.
Now click the Save button and close the window; and from now on this server will be automatically connected to in silent mode (no windows will be displayed) when an internet connection exists.
The Active Server list
The Active Server list is the place where you control your Telnet Connections. The list contains all servers you want to connect to. You see their actual connection status; you can activate the server and channel windows and you can also remove a server from the list. To add a server go to the available server list and press the connect button. If you have any Auto Start servers then they will be automatically displayed in this list every time you start SWISSLOG.
The page is divided into 3 parts:
On the left is the list of the active servers. Details about the selected server are displayed in the middle and right part.
In the middle 'Windows' part you see a number of buttons. These buttons allow you to switch to or to open a listed server and channel windows. Each button represents a window. In the example I have selected an IRC server and I joined two channels: #cqdx and #IOTA. Therefore you see 3 buttons:
the first, CQDX-IRC, controls the server window. There is not much going on in this window of an IRC server, but sometimes you may want to look at it.
the second button represents the #cqdx channel window. The channel window is the place where things happen for an IRC server (to chat to other operators, for example).
the third button represents the #IIOTA channel, a channel I created myself.
For a Telnet server you will see only one button. Everything happens in the server window.
On the right part you see the current status. This is information about the active server; and also some information I may need if something does not work as expected. (The most important item for me is the Trace Active check box. If this box is checked a trace file is written in the current directory. In case of problems I may ask you to check this box and send me the trace.)
Open / Close the server windows
The Telnet support in SWISSLOG can run without any windows open. You can open and close the windows at any time. With the help of the windows buttons in the Active Server page you can open the windows.
to open a window select the server in the server list and the press on the window button. If the window is already open but minimized or hidden behind other windows then the server's window is activated. If there is no window then the window is created and the server traffic is displayed in it. When there is no open window the traffic is not recorded; only DX-Spots and WWV messages are filtered and displayed in the corresponding windows: DX-Spots in DX-Messages window and WWV in the Parameters of the Propagation Prediction.
to close a window just close it by pressing the close button
in the right upper corner of the window. When the window is closed, the traffic is not recorded anymore.
Disconnecting from a server / Remove a server from the Active Server list
All windows have a Disconnect button
to disconnect from the server without removing the server from the Active Server list click on the server name button in the Windows column of the Active Servers window to active the window for the server you want to disconnect from, and then click on the disconnect button in that server's window.
- to remove a server from the Active Server list on the Active Server list page
select the server and click the Disconnect button on the Active Servers tab or
select the server and click the Disconnect button on the Available Servers tab
If you remove a server from the Active Server list you will be disconnected from that server.
The traffic is recorded in 'Traffic windows'. The kind of window depends on the type of server you are connected to. Currently 3 types of windows are supported:
a Simple Server window for Telnet servers of unknown type. All incoming traffic is displayed on the same page. This kind of window is opened if the server type is empty or 'Std' (standard).
a DXC-Server window for servers which run DX-Clusters. The traffic is split into several streams, each of them displayed in separate page.
two windows are used for IRC servers (Internet Relay Chat)
the server window: this is a Simple Server window to list the server traffic. But you will not often use it, because it does not contain much exiting information
the Channel windows: there is one window per channel and you can join many channels on an IRC server. This is the place where things happen. The traffic is split into several streams and displayed on separate pages. In addition you have a User page listing all users and an unlimited number of User pages for chats with other users.
You can change the font of the message windows. To do so place the cursor in the message window of which you want to change the font and press the
button.
DXC-Server window
Page tabs which are highlighted mean that these pages contain data you have not yet read.
This window has the following 5 pages:
DX-Spots: DX-Spots are displayed on this page
WWV: WWV messages are displayed on this page
To All: This page contains announcements addressed to all
To Me: This page contains talk messages addressed to you only. The callsign to which SWISSLOG is registered to is used for logon.
Server: All messages which do not fit in one of the pages above are displayed here
The five buttons at the top are shortcuts for often used commands. Because the command syntax varies depending on the software used by the server the results are not always the same and in some cases the commands do not work.
The commands are:
SH/DX: Show the last DX-Spots. The number of spots you receive depends on the server; some send 5, others 30 or more
SH/ANN 5: Show the last 5 announcements
SH/WWV: Show the last WWV message
Send ANN: send an announcement. When you press this button the following dialog is displayed:
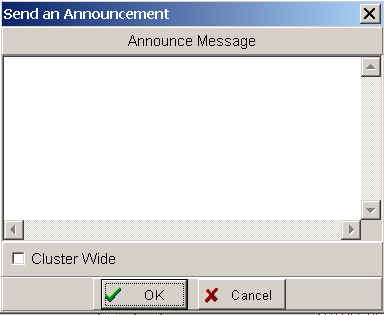
Enter the message you want to announce. Check the check-box Cluster Wide if the announcement should be sent to all interconnected servers. If the check-box is not checked, the announcement is only sent to the server you are connected to (local).
Send DX: Send a DX-Spot. When you press this button the following dialog is displayed, pre-filled with information of the active QSO:
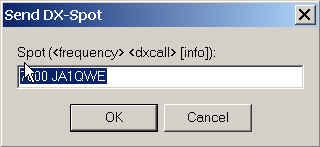
You can add your comment at the end.
The IRC (Internet Relay Chat) windows
The #CQDX IRC channel is my preferred way to connect to a DX-Network. You can learn more about CQDX here.
Two types of windows are used for IRC servers.
the Server window: this is a Simple Server window to list the server traffic. I will not further explain it because it does not contain exiting information
the Channel windows. There is one window per channel; you can join many channels on an IRC server. This is the place where things happen. The traffic is split into several streams and displayed on separate pages. In addition you have a User page listing all users and any number of User pages for chats with other users.
Channel window
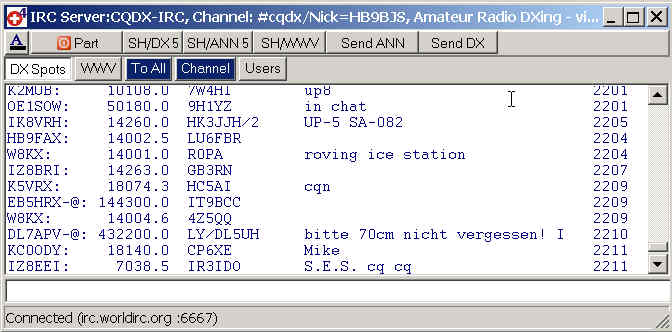
Page tabs which are highlighted mean that these pages contain data you have not yet read.
This window has the following pages:
DX-Spots: DX-Spots are displayed on this page
WWV: WWV messages are displayed on this page
To All: this page contains announcements addressed to all
Channel: this page contains Channel traffic which can not be assigned to one of the other pages (for example the public chats)
Users: this page contains the list of users who have joined the channel. You will find more about this page later.
Talk pages:: each of these pages represent a private talk channel to an other user.
The six buttons at the top are short-cuts for often used commands. .
The commands are:
Part: issue the /Part command to leave the channel
SH/DX 5: show the last 5 DX-Spots
SH/ANN 5: show the last 5 announcements
SH/WWV: show the last WWV message
Send ANN: send an announcement. When you press this button the following dialog is displayed:
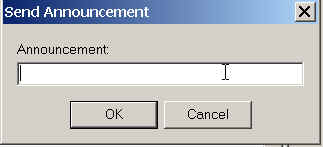
Enter your message and press OK to send it.
Send DX: send a DX-Spot. When you press this button the following dialog is displayed, pre-filled with information of the active QSO.
You can add your comment at the end.
Talk Function
The Talk function allows you to send messages to a specific user. With SWISSLOG you can open a separate window for each private 'chat'. Two pages contain the needed functions. In the Users page you initiate a private chat and in the Talk pages you chat.
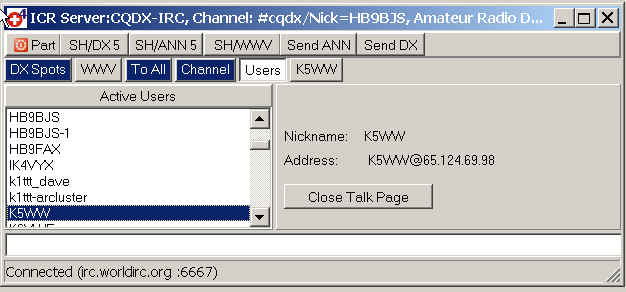
Sending a single private message
To send a single message to one of the users:
select the user you want to send the message to
enter the message in the edit line at the bottom of the window
press enter
Initiate a Talk
If you want to send several message or to enter a longer chat, create a Talk window. All messages exchanged are then recorded in this talk window.
To open a Talk window:
select the user you want to send the message to
press the 'Add Talk Page' button. Note that the button will change to 'Close Talk Page' if a talk page exists for the user
now select the page with the user's name on it and start sending your messages
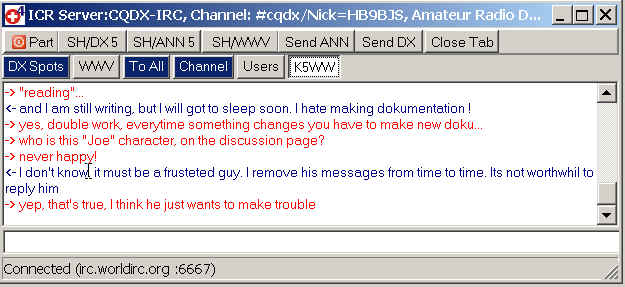
Here is an example:
Receiving private Messages
If somebody sends you a private message SWISSLOG automatically opens a Talk Page.
Maintaining the Available Server list
To be able to connect to a server SWISSLOG needs some parameters describing the server. These parameters are stored in an external file and loaded into SWISSLOG at startup. The list is displayed on the the Available Servers list of the Telnet Control window where you can add, edit and delete server entries. The external files which contain the server parameters are stored in the SWISSLOG main directory and are named:
Telnetservers.Bin - this is the file which is loaded and contains your modifications
Telnetservers_orig.bin - this file is distributed with SWISSLOG and is loaded if Telnetservers.Bin is not found. It contains the original definitions. Note: I did not verify all definitions therefore there is no guaranty that the definitions are correct.
To add, edit or delete a server entry select the entry and double click it or press the
button. The following dialog is displayed:
The Edit Server Configuration window
If you open the Edit window it will stay open until you close it manually.
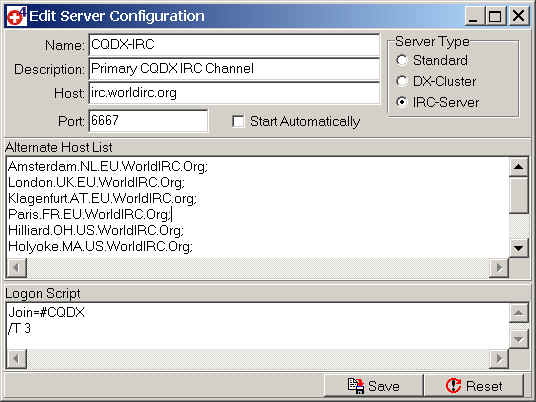
Field Descriptions
Fields in red are mandatory
Name:
This is the name of the server. It should be relatively short and unique. It is used to identify the server.
Description:
You can put a more detailed description here. This is not used by SWISSLOG.
Host:
This is the address of the server. It can be a URL or a TCP/IP address.
Port:
This is the port you have to connect to. This field is only needed if the server is on a non-standard port. The standard port for telnet servers is 23 and the one for IRC servers is 6667.
Server Type:
Here you define the type of the server.
Standard (Std) for a standard telnet server which does not run a DX Cluster program
DX-Cluster (DXC) for a server which runs a DX-Cluster program
IRC-Server (IRC) for an IRC server
Start Automatically:
If this check-box is checked a connection to the server is automatically established at SWISSLOG's startup.
Alternate Host list:
If you can connect to a server with different host names (addresses) you can list these addresses here. The addresses must be separated by a ';'.
Logon Script:
This is the script needed to logon to the server. See Scripts for more details.
Scripts
Scripts are needed for automatic connection/reconnection to servers. Most servers require that you login; that means that you identify yourself. Normally this is a manual process; meaning the server sends a request and you have to reply. With a script you can automate this process. You can define that SWISSLOG waits for a particular word or series of words and if these words are received the next script line is executed. This can be a /S command to send the required reply, or a number of other commands. In this way you can automate a complicated login procedure.
SWISSLOG contains a very simple scripting feature. The commands are compatible with the scripting used in DXTelnet but not all of its commands are implemented.
Script Commands.
/K text
Set the 'Keep Alive' text.
SWISSLOG checks if the connection is still alive by sending a command if no message was received during a certain time. Here you can set the text which should be sent for this check. If nothing is specified an empty line (CR) is sent.
Example: /K /BE send /BE as alive message
This command is executed immediately; SWISSLOG will immediately go to the next command (if any).
/P text
Set the prompt string.
This command is not yet used by SWISSLOG
/S text
Send text to the server.
If the text contains the character sequence '$$$$' it is replaced with the call sign to whom this SWISSLOG copy is registered.
Examples:
/S HB9BJS sends out my call (HB9BJS)
/S $$$$ sends your call if SWISSLOG is registered to you
/S use $$$$ as user name for talk messages sends out 'use HB9BJS as user name for talk messages'
This command is executed immediately; that means SWISSLOG immediately goes to the next command (if any).
/T n
Sets the reconnect timeout in minutes; if not specified it defaults to 2 minutes.
If no message was received during n minutes an alive message is sent (see K) *
Example: /T 3 sets the reconnect timeout to 3 minutes
This command is executed immediately; that means SWISSLOG will immediately go to the next command (if any).
/W text
Sets the string to wait for. The string recognition is not case sensitive
Example: /W password makes the script wait until you receive the string "password".
Note: there is one exception. The command /W LOGIN will also terminate when the word Call is received. The reason for this is that some servers ask for login and others for call. But it's almost impossible for me to find out which server uses which word.
This command is executed immediately; that means SWISSLOG instantly goes to the next command (if any).
Join=channel [;channel]
This is a list of channels to join as soon as the IRC server is connected. You can connect to several channels at the same time; but their names must be separated with a ';'.
Example: Join=#CQDX;#IOTA Join channels #CQDX and #IOTA
This command is executed immediately and works only with IRC servers.
Logon Script Examples:
Standard Login Script
This is a script which works for most Telnet servers. Remember that /W login also means /W call
/W login
/T 5
/S $$$$
/W de
/S set/nodxsqth
/P de
Login Script for servers with Echo ONSome servers by default Echo the character you enter. Because SWISSLOG displays what you enter you will see your entries in double. You can turn of the Echo function by adding the unset/echo command to the script.
W login
/T 5
/S $$$$
/W de
/S unset/dxgrid
/P de
/W de
/S unset/echo
Login Script for an IRC server
Login is handled fully by SWISSLOG, so you don't need any login information in IRC scripts. But you have to tell SWISSLOG to which channels you want to connect. So an IRC script is simple, for example:
Join=#CQDX
/T 3
Special Connections (DXTelnet, DXConcentrator)
Programs which support connections via TCP/IP can now be connected to SWISSLOG's TCP/P connections. This means that we can overcome the not very reliable DDE connections and in addition such programs can run on an other computer if you have a network.
DXTelnet
Fabrizio (IK4VYX) has described how to connect DXTelnet via TCP/IP in an article titled 'Virtual Power but Real Results'. You may wish to read it too.
The DXTelnet download URL is: http://members.tripod.com/dxhunter0/download.htm
Set-up a TCP/IP connection with DXTelnet
First-time setup in DXTelnet
The following operations must be performed only the very first time.
start DXTelnet
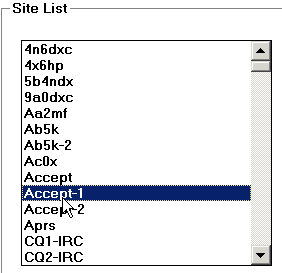
select Session ¦ Site List...
in the Site List select Accept-1 and press Edit
now press Edit Script
clear the existing lines and enter the following two lines:
/C TERM 3
/F RELAY-1click OK to save the new script
Click on OK again to save all changes
Click on OK on the warning message box you will get
Now press ESC to hide the site list
Quit DXTelnet (Alt+F4)
Start DXTelnet TCP/IP connection with SWISSLOG
start DXTelnet
in DXTelnet perform the following steps:
select Session ¦ Site List...
in the Site List select Accept-1
switch to SWISSLOG
in SWISSLOG perform the following steps:
open the Telnet Control window (View ¦ Telnet Control Window)
activate the Available Servers Page
from the Active Servers list select the DXTelnet Server and press the Connect button
now SWISSLOG and DXTelnet are connected
You can start as many DXTelnet session you want. The traffic of all DXTelnet sessions is sent to SWISSLOG. But make sure that you not stop the very first DXTelnet instance (Acccept-1), because this is the relay through which information between DXTelnet and SWISSLOG is exchanged.
DXConcentrator
DXConcentrator was developed by Jacques Debouche ON5OO. Here you find details about DXConcentrator.
To connect DXConcentrator to SWISSLOG you have to add DXConcentrator as Server to the Available Servers list (note: it may already be there).
Add DXConcentrator to the Available Servers list:
open the Telnet Control window (View ¦ Telnet Control Window)
activate the Available Servers page
press the Add button
in the Edit Dialog enter the following Data and press Save
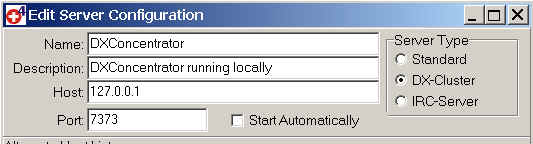
Note: if you run DXConcentrator on an other computer you must enter the address of this host.
close the Edit Dialog.
Now the Server DXConcentrator is added and you can connect to it like any other Server