Logbook View – Using Queries
Loading the logbook fields is controlled by a function know as a Query. You can select which query is used, and with help from the Query editor, you can define which fields are loaded by the query. Rather than start with a blank page and create a query from scratch, try using one of the sample queries provided with SWISSLOG. The sample queries are usually located in the directory named: ...\SWISSLOG\Queries\Logbooks and these files have a file extension of .SPQ
To use some of the powerful logbook functions, all of the QSO’s in the log must be loaded into the computer's memory. As an example, the Grouping function requires all QSO’s to be loaded into memory. By contrast, the standard logbook view only requires the QSO’s that are visible on the screen to be in the computer's memory. As you can appreciate, if the log database is very large it is going to require more computer time to open the logbook. Obviously, this disadvantage is somewhat reduced with a fast computer. However, rather than rely on a faster computer, it's often better to plan your query and load only the fields that are needed to accomplish the work you’re trying to do.
If you have created a logbook in SWISSLOG and you would like to experiment with one of sample queries, follow the three steps listed below:
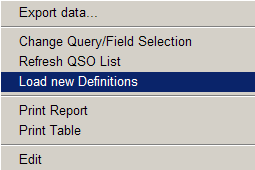
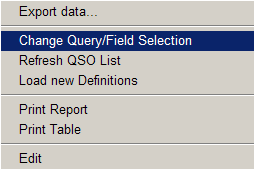
When the View Logbook window is already open, you can change to another Query by selecting Load new Definitions from Functions on the main menu, or by activating the pop-up menu. To activate the pop-up menu, position the mouse cursor anywhere within the log and right-click.
Hint: If you need to make a few simple changes to the layout of your logbook, it is generally easier to make those changes by working directly in the Logbook View. For specific information on customizing the Logbook View, click here.
There are a number of changes that can be made to a Query which will significantly affect the appearance and layout of a log. Rather than create a query from scratch, it's generally easier to modify an existing query. Using the Query Editor, you can add or delete columns, rearrange the placement of columns, change the alignment of data within the columns, and even change the format of the data – and that's not all – specific details are described below.
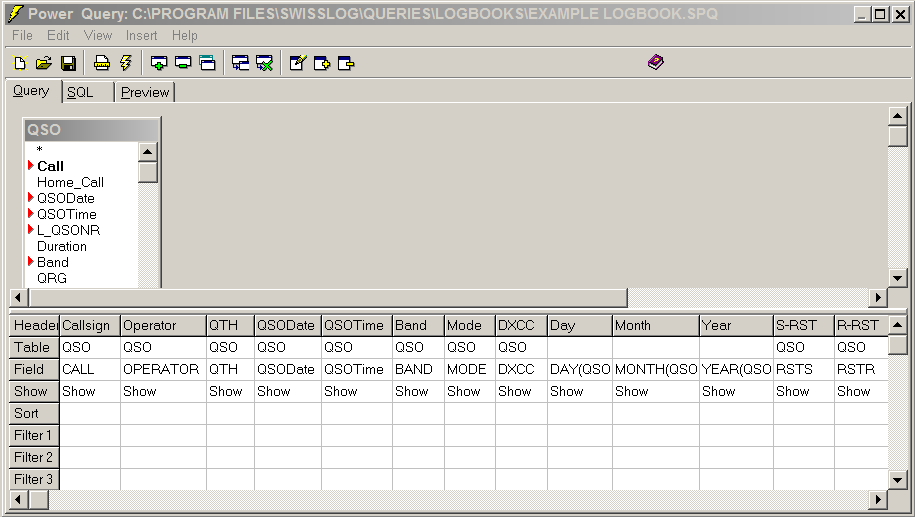
Referring to the Query Editor picture above, the QSO table is shown at the top-left side. You might think of the QSO table as a menu – you can select items from the menu to include in your query. Notice some of the items listed have a small red arrow in the left margin. The red arrow indicates the item is currently used in the query table shown below.
The lower portion of the Query Editor window is a workspace or a table of cells defining which columns are displayed in the View Logbook.
Add a field to the Logbook – The easiest method is to select an item
from the QSO table, then drag it to the position where it should be inserted
in the workspace.
Hint: Generally, it is always
easiest to use the Drag and Drop technique for any editing.
Moving or rearranging columns – To move a column within the workspace, click on the column heading and drag it to the new location. This takes a little practice; when you first click on the column the cursor changes to a thick line at the left side of the column to be moved. As you drag the column to a new location, it will be inserted at the left of the cursor line. Try it a few times, a hands-on demo will be much easier to understand.
Deleting a field – Select a field and press the delete key. The field
is removed from the workspace table. If you removed the field accidentally,
you can add it back into the workspace by selecting it from the QSO table as
described above. You can also select a field to be deleted and then
right-click with the mouse; select Remove Value from
the pop-up menu.
Hint: In some cases, you may not
like the changes you've made to the query. Rather than trying to fix the
problems, it may be easier to revert back to the original query and start
over. This is just like using a word processor; you can close the Query Editor
without saving the file and then start over. Close the Query Editor
window and Do Not Save the File, or Save the File using a different filename. When
you attempt to close the editor, a dialog window will ask you to confirm, Save
changes to.... in this case select No.
Changing the format of field values – To select a field, double-click
on the field and the Value Editor will pop-up. Verify that the Value Editor
lists the field you want to edit – a common mistake is accidentally
selecting another field. There are a number of properties defined within the
Value Editor. For this example,
we'll consider changing
two of the properties that affect the appearance of data displayed in
the log. Double-click on the field QSODate under
the column heading Date or Datum.
Hint: You can also right-click on a
field and select Edit Properties from the pop-up
menu to open the Value Editor.
The Value Editor lists several properties specific to the QSODate field –
toward the bottom of the list, there are five properties defining how the
QSODate field is displayed in the log. With the exception of the format
property, each property offers a scrolling list of the possible values. The
most obvious (easiest to understand) property is labeled Alignment
– click on the value shown at the right of Alignment, a
drop-down box will appear, click on the arrow to expand the box of
choices. For the Alignment property there are three choices – Left,
Right or Center – select one and the QSODate will be aligned in the column
using the value you selected.
The QSODate Format property is somewhat different
as it does not offer choices from a scrolling list. You can define the date
format you prefer to use, by entering standard date abbreviations used by many
programs and operating systems. Formatting symbols may be written in upper
case or lower case letters – both – produce the same result. A few of the
common time and date formats are shown in the table below:
| Symbols | Description |
| hh:nn | 23:59 – Hours and minutes using 24 hour clock |
| h:nn am/pm | 11:59 pm – Hours and minutes using 12 hour clock with am-pm indicator. |
| mmm d, yyyy | Jan 1, 2004 |
| mm/dd/yyyy | 01/01/2004 – Day and month might be ambiguous, depending on country. |
| dd mmm yy | 01 Jan 04 – From the perspective of readability, the dd mmm yy format is preferred. The day and month are not ambiguous and the symbol groups do not require punctuation – although a single space between the letter groups further enhances readability. |
The table above shows only a a few of the formatting symbols that can be used in Reports and Queries. In addition to symbols for date and time, there are also formatting symbols for numeric fields, such as the frequency field. For complete details on the various formatting techniques and symbols click here.
Hint: The format properties used
for the following fields; QSODate, Day, Month, and Year, only affect the
corresponding values displayed in the Logbook View.
When using the date in a search value, the date must be entered as defined by
the Windows operating system. If an error message appears, or if your search
results in a empty logbook, verify that the date format used in the search is
formatted correctly. An easy way to verify the correct format is to click on
the arrow in the Date column heading and select (Custom)
from the drop-down list. When the Custom AutoFilter appears, click on the
arrow beside either of the empty boxes on the right side. When the calendar
appears, click on Today – the date shown will
be in the correct Windows format – click cancel to exit.
Important Hint: Referring back to the Query Editor picture above you can see three fields: Jahr (Year), Monat (Month), and Tag (Day). The data for these three fields is extracted from the QSODate field – the year, month, and day are extracted as separate fields. The purpose for creating the separate fields is because it makes filtering by date much easier. By doing this, you can define a filter that will select a specific year, month, and the day. If you use only the QSODate field, the filter would return a value for everyday there is an entry in the log – that is not particularly useful. However, you may prefer to see the QSO date in one column and shown in a conventional format such as Day/Month/Year – in this case, the query would contain both the separate fields and the QSODate field. Detailed information on filtering is in another section below.
Selecting subsets of QSO's – This function allows you to display
specific QSO's in the Logbook View rather than all QSO's in the log.
You are actually creating a filter – based on the filter parameters, the
filter will search the log and display only the QSO’s that match the values
specified by the filter.
Using the Query Editor window, select a field in the workspace, double-click
on the field and the Value Editor will pop-up. Click on the second tab labeled
Filter and enter the filter criteria.
The first two properties; Number and Command, offer a scrolling list of the possible values.
Click on the arrow next to the value to expand the list of choices. Number
allows you to define multiple filter parameters; Filter 1, Filter 2, etc. Each
filter can have its own logical Command – choose one the logical Commands
available in the command list. Then enter the appropriate value in the Value
space.
As an example, try creating a filter for the Band field – to create a filter that displays only QSO's on the 15m and 20m Bands, complete the following steps. (If you don't have 15m and/or 20m contacts in your log, select other values for this example).
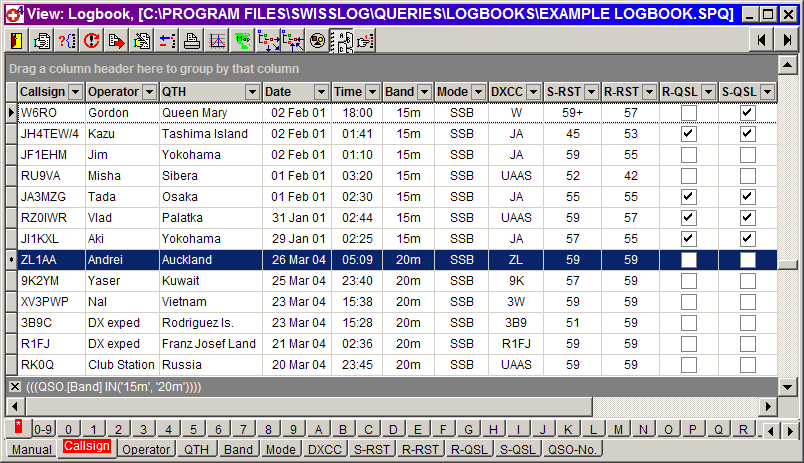
When the Query editor closes, your log will be displayed listing only the contacts on the 15m and 20m Bands. You can go one step further and sort the displayed log to show all of the 15m contacts first and then the 20m contacts. Click on the Band column heading, notice the arrow pointing up or down for ascending sort or descending sort. Click on the Band column heading once or twice and observe the changes.
Below is an image for the example above – this image is based on the Query named Example logbook.spq which is usually found in the following directory: ...\SWISSLOG\Queries\Logbooks
Copyright © 2004 SWISSLOG
Last modified: 10 Jan 2005