Preparation for eQSL
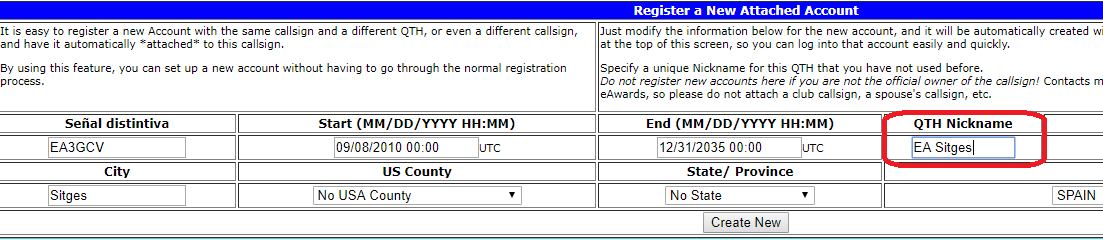
Before you can use the eQSL functions in SWISSLOG, you will need to register and create an eQSL account in www.eqsl.cc. If you use different callsigns or different locations for the same callsign, you have to create a new attached account in the My Accounts option. VERY IMPORTANT: It's mandatory to assign a name in the QTH Nickname field because it will be used to associate your eQSL accounts to the corresponding My QTH in Swisslog. Write down the QTH Nickname for every of your different accounts because you will need them to configure the eQSL synchronization later in Swisslog. If you already have an eQSL account, go to My Profile and check that the QTH Nickname field is filled in all your accounts.
If you are new in eQSL, I suggest to read the following links:
Once you have your eQSL account(s) ready, it's time to configure Swisslog.
To configure Swisslog for eQSL you will need to perform the following steps:
To start the configuration of Swisslog select from the main menu:
In the eQSL system, the QTH Nickname represents the QTH's you are working from. In Swisslog the equivalent data would be the QTH's that are listed as My-QTH's. Therefore, we have to make a link between the QTH Nickname and the Swisslog QTH. This is accomplished by putting the name of the eQSL QTH Nickname into the eQSL Nickname field that is adjacent to the appropriate Swisslog My-QTH Name field. This may sound confusing now, however it should be clear when you review the dialog window shown below:
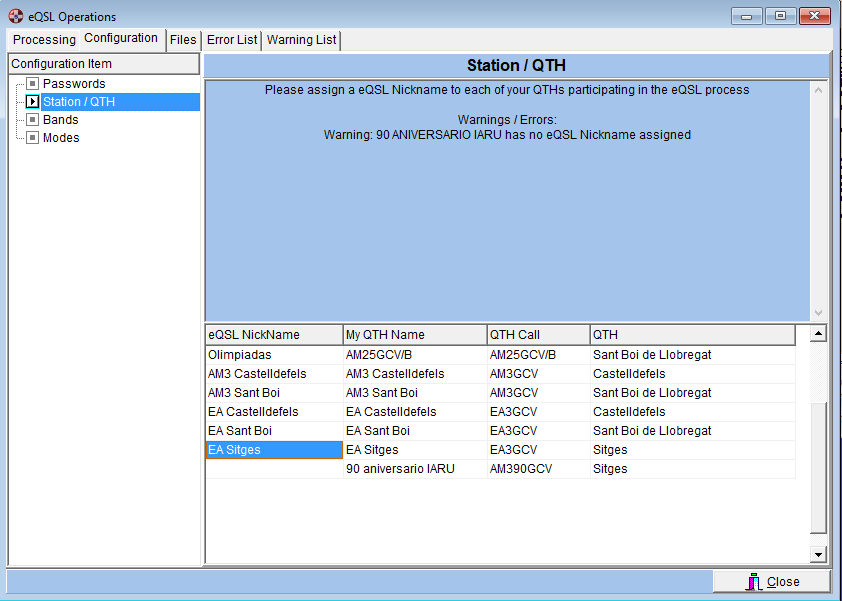
The first time the Station / QTH window is opened, you will see list of your QTH's in the center column under the heading My QTH Name. The fields in the first column under the heading eQSL Nickname will be empty and you will see a warning message for each QTH informing you which My QTH don't have any associated eQSL Nickname.
Enter the QTH Nickname in the eQSL Nickname field of the corresponding My QTH, exactly as you entered in your eQSL account! (case sensitive). If you do not want to synchronize the QSO's made from a particular QTH with eQSL, leave the field blank.
Error and/or warning messages may be displayed in the top part of the dialog window. You can not synchronize with eQSL as long as there are error messages.
| Possible error message: | Corrective action: |
| None of your existing My QTH have eQSL Nickname assigned! You have to set at least one QTH Nickname in order to perform the eQSL synchronization. | Assign an eQSL Nickname at least to one of your existing My QTH |
| Possible warning message: | Corrective action: |
| QTH: has no eQSL Nickname assigned | Assign an eQSL Nickname to this My QTH if you want to synchronize it with eQSL |
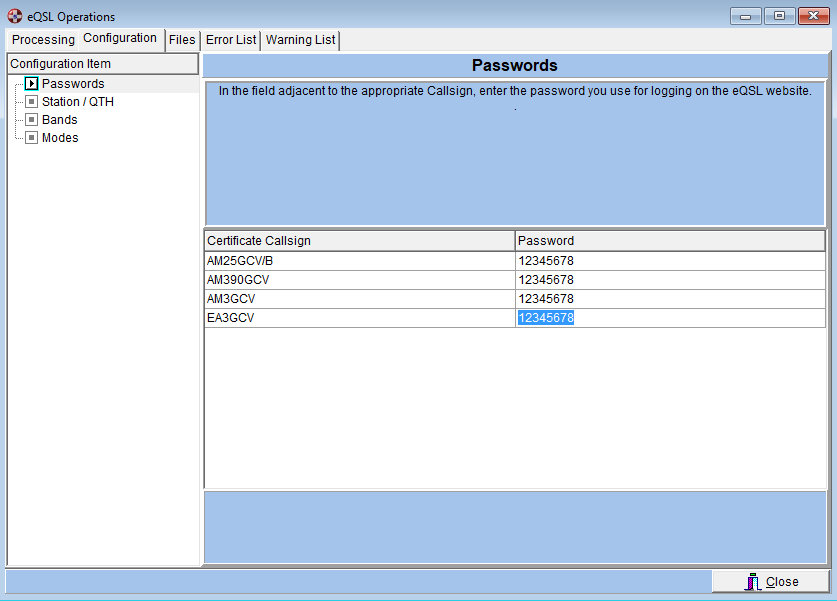
Enter here the password that you use for logging onto the eQSL website.
Although eQSL is now ADIF v3 compliant, according to my experience, and depending how the QSO partner has uploaded the QSO into eQSL, it may happen that the ADIF from eQSL contains a mode/submode or band which it's not ADIF v3 compliant. Swisslog therefore insures, that the correct names are used and converts them as necessary. If Swisslog does not know how to convert one of theses names, it will prompt you for the correct name and store the information in the mapping tables.
Hint: At this point, you don't have to enter any mapping information at all because Swisslog will ask you when it needs information. Therefore, if you're not sure about the mapping information that might be required, wait until Swisslog prompts you with the pop-up dialog windows. It's also possible you won't need to do any mapping.
If you decide to enter mapping information manually, open the dialog window as shown below:

Copyright © 2004 SWISSLOG
Last modified:
20 ago. 2018