Multiple QSO Update
This section describes the functions in SWISSLOG that allow you to update or
change a field in several QSO's with just a few steps. Using the Multiple QSO
Update functions it is possible to:
Occasionally, you might run into a situation where you
would like to change a field in several QSO’s to the same value. This is
easily accomplished using the Edit ¦ Change function in the Logbook View – follow
the steps listed below:
- Open a Logbook View by selecting View ¦ Logbook (either Last or
Selection) from the main menu.
- Select the QSO's you would like to change – the easiest way is to click
on the QSO's using the mouse.
Hint: To select a block of QSO's
(meaning several QSO's that appear one after the other in your log) –
click on the first QSO – then press and hold the Shift key
– then click on the last QSO in the block. The block of QSO's that you
selected will be highlighted.
To select several QSO's which are not in a contiguous block, use the mouse
in combination with the Ctrl key. Click on the first QSO – then
press the Ctrl key and hold it down while selecting another QSO with
the mouse. To select additional QSO's, click on them with the mouse and
remember to press the Ctrl key.
You can combine the two techniques described above – by using the
mouse and Shift key when selecting blocks and the by using mouse and Ctrl
key for selecting single QSO's. For example, you can select a block QSO's
and then unselect individual QSO's within the block by using the mouse and Ctrl
key. You can also scroll the logbook display and continue the
selection process.
Hint: If you need to find and select a
large number of QSO's, it may be easier to use one of the many filtering or
selection functions within the Logbook View, or a combination of filtering
and manual selection. For complete details on the Logbook View functions click here.
- After you have selected the QSO's to be changed, the next step is to
select the field to be changed. Click on the cell of the field to be
changed – a dotted line will frame the selected field.
Hint: If you selected multiple QSO's
using the mouse and Shift key and/or the mouse and Ctrl key, you will need
to press either the Shift key or the Ctrl key when you select the field.
Otherwise, when you attempt to select the field, you will actually cancel
the selections you made previously – nothing is lost, you just have to
repeat the selection process.
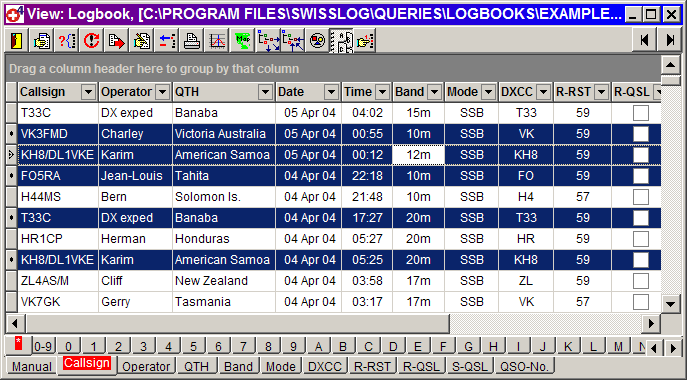
Below is an example showing the Logbook View with several QSO's selected and
the Band field selected – this image is based on the Query named
Simple logbook.spq which
is usually found in the following directory: ...\SWISSLOG\Queries\Logbooks
- From the main menu select Functions ¦ Edit ¦ Change, or
right-click in the Logbook View to activate the pop-up menu shown below:

- Depending on which field was selected in step 3, a selection
window or an input window will be
displayed. This dialog window allows you to define the value that will be
entered in the field.
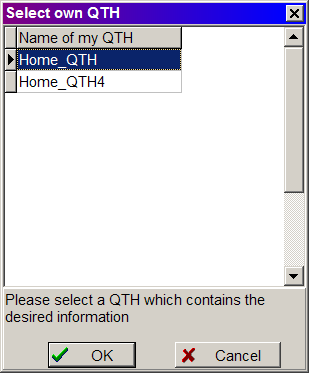
Hint: If you selected a field which
is part of the My-QTH table such as the Own-QTH field, you cannot input a
new value via the input window, you can only select one of the existing
My-QTH entries listed in the selection window. Therefore, if you need to
change the My-QTH value to a new value, you must first create a new entry
using the QSO Entry Window – My-QTH Page
before you attempt to make QSO changes. This
is a safe-guard against accidentally changing the My-QTH value on multiple
QSO's which is extremely difficult to correct.
| The image below displays the selection window for changing the QTH field: |
|
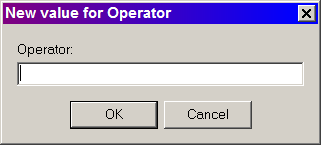
The image below displays the input window for changing the Operator field: |
|
|
|
 |
|
 |
- Make the appropriate selection or enter the new value in the input window
and click OK.
- The following warning will be displayed:
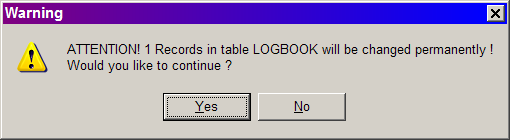
 IMPORTANT:
This is your last chance to stop the modification process – click Yes
only if you are sure you want to make the changes.
IMPORTANT:
This is your last chance to stop the modification process – click Yes
only if you are sure you want to make the changes.
You can automatically fill in some of the data fields
for QSO’s, which are already in your log using the Update QSO’s function.
This is accomplished by retrieving information from a Callbook Database (using
either a CD or the Internet) and/or from the Country Table. You may find this
function particularly useful...
- if the Callbook DB or Country Table has been
updated.
- if you did not have the Callbook CD available when
you originally entered QSO's.
- if you changed the geographical location for one of
your QTH's and you want to update the distance and the azimuth data.
- if you want to enter data not introduced when you originally entered the
QSO such as Name, QTH or even the State, County or IOTA.
NOTE: Keep in mind that if
you update State or County maybe the current ones are not the same as the
ones worked during the QSO.
The Update QSO's with Data from Country-Table and
Callbook-CD function is accessed within the Logbook View.
- Open a Logbook View by selecting View ¦ Logbook-View (either Last
or Selection) from the main menu.
- Now select the QSO's you would like to update – the easiest way is to
click on the QSO's using the mouse – or use a combination of manual
selection and the filtering capabilities in SWISSLOG. For information on
manually selecting QSO's, see paragraph 2 in the section above or click here.
Hint: If you need to find and select a large number of QSO's, it
may be easier to use one of the many filtering or selection functions within
the Logbook View, or a combination of filtering and manual selection. For
complete details on the Logbook View functions click here.
- Select Functions ¦ Update QSO's with Data from Country-Table and/or
Callbook-CD / Internet Databases from the main menu, or right-click in the Logbook View to
activate the pop-up menu. The Update QSO's dialog window will appear
as shown below:
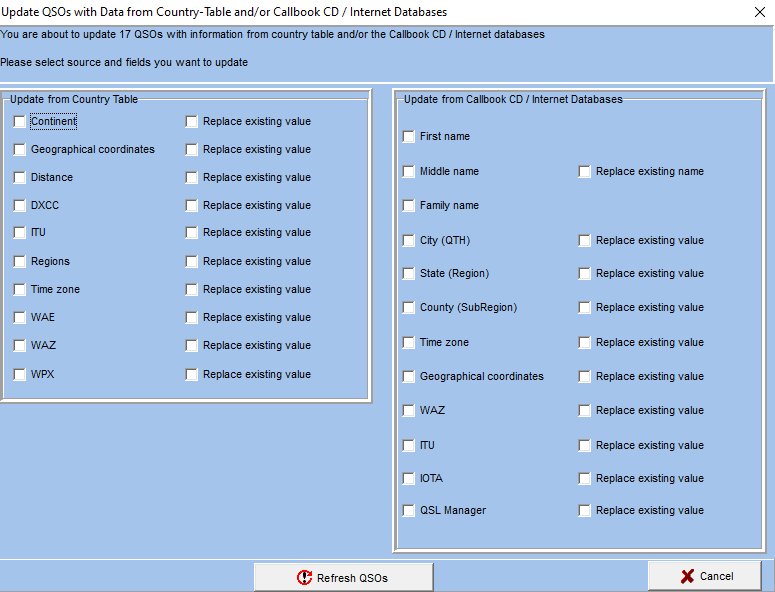
- Check the fields you would like to update.
Note: SWISSLOG only updates fields which are empty unless you check the box
next to – Replace existing value.
- After you have marked all fields you want to update, click on – Refresh
QSO's.
Hint: Depending the the size of
the log, the number of changes, and the speed of the computer, the update
process can require a considerable amount of time, be patient.
DIG, AGCW, and Ten-Ten International are organizations that promote amateur
radio activities and encourage contact with other club members. Generally,
these organizations issue a membership number to their members – the
membership number is therefore associated with an individual's callsign. Often
these clubs issue awards based on completing a certain number of QSO's with
other club members and this requires a method of tracking these unique
contacts. SWISSLOG implements a lot of statistics for tracking
these QSO's so the membership number
will be inserted automatically into the QSO.
However, in some situations when you import QSO's or activate the statistic
after there is a large number of QSO's in the log, the member number might not
be present in every QSO. The Update QSO function allows you to add the
membership number to all QSO's in your log that should have a number
associated with them.
- From the main menu select Tools ¦ Update QSO's for Callsign based
Statistics
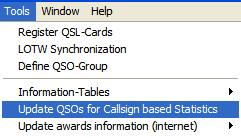
- The following dialog window is displayed:
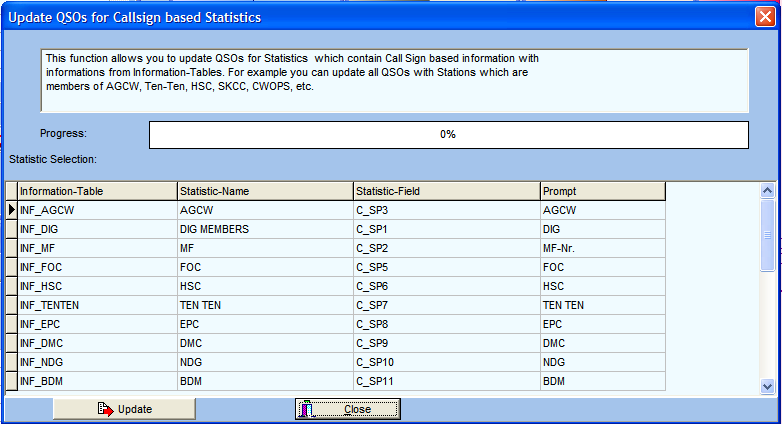
- From the list displayed, select the Statistic you want to update and press
Update.
After you have printed the QSL Cards or QSL Labels, you
should set the QSL-Sent Indicator. You can set QSL-Sent indicator by using one
of the three functions listed below:
- Print QSL Cards Wizard, for details click here.
- Register QSL Card Window (which is a specialized
Logbook View)
- Logbook View
Setting the QSL-Sent Indicator in the Logbook View
- Open a Logbook View by selecting View ¦ Logbook-View (either Last
or Selection) from the main menu.
- Now select the QSO's you would like to update – the easiest way is to
click on the QSO's using the mouse – or use a combination of manual
selection and the filtering capabilities in SWISSLOG. For information on
manually selecting QSO's, see paragraph 2 in the section above or click here.
Hint: If you need to find and select a large number of
QSO's, it may be easier to use one of the many filtering or selection
functions within the Logbook View, or a combination of filtering and manual
selection. For complete details on the Logbook View functions click here.
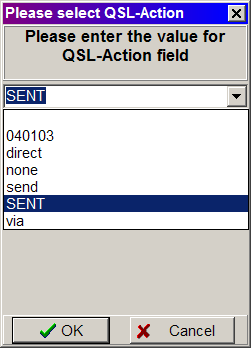
- Select Functions ¦ Set QSL-sent Indicator from the main menu, or
right-click in the Logbook View to activate the pop-up menu. The QSL-Action
dialog window will appear – select the appropriate value from the list or
enter a new value – usually the action is SENT.
Then click on OK.
Copyright © 2004 SWISSLOG
Last modified: 06 jun. 2017