Printing QSL cards
SWISSLOG offers several ways to print QSL cards – the technique you use depends on how you intend to QSL. As an example, if you only send QSL cards when you receive a card, you could use the feature to add a QSO automatically to a QSO-Group when the QSL-received indicator is set. This function is available in the Register QSL-Cards dialog. If you have set up QSL Rules for QSL'ing, you can either select the QSO's with the corresponding QSL-Action set in the logbook view or use the QSL-Print wizard.
As mentioned above, there are several ways to select the QSO's. It is important to know that printing the QSL-Cards and setting the QSL sent indicator are two separate steps. That means you must be able to reselect the QSO's you printed or keep the QSO's selected so that you can set the QSL sent indicator. The reason for this two-step approach is to insure that the QSL cards are physically printed before the indicator is set. The print process is not fully under control of SWISSLOG and therefore, errors could occur that are not known to SWISSLOG. For this reason, you are required to confirm that the printing is OK by manually setting the QSL sent indicator.
Three methods for printing QSL Cards:
Read also:
You activate the Print QSL-Cards Wizard by selecting Wizard ¦ Print QSL-Cards from the main menu. The following dialog will open:
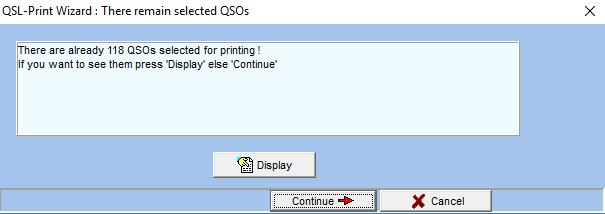
The above dialog allows you to continue working with previously selected QSO's or with a new set.
Select Display if you want to continue working with QSO's selected previously
Hint: Do you remember which cards you had previously selected to print? You can check by pressing the Display button. You may need to set the QSL sent indicator for the QSL-Cards you have already printed; otherwise, you might end up printing the same cards again!
Press Continue if you want to create a new list – this opens the selection dialog shown below:
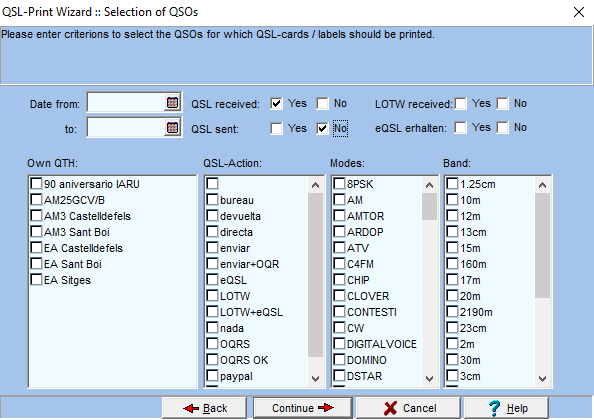
The above dialog allows you to select the QSO's that should be printed. It contains all of the fields that are normally used to select QSO's for QSL-Printing. If a field is missing, you can apply additional filtering later in the QSO-view.
Referring to the dialog window shown above – note that the selection arguments are only applied by checking the appropriate boxes. If you do not select a filter, then all QSO's will be selected. In the example above, the QSL received filter has been set to Yes and the QSL sent has been set to No by checking the appropriate boxes. Therefore, all QSO's for which a QSL Card was received but none was sent are selected. None of the other filters shown have been selected.
Hint: You can select as many filter arguments as needed. As an example, you might check several modes and bands.
Again referring to the dialog window shown above – If you selected a QTH – such as the Home QTH – then only QSO's made from the Home QTH for which a QSL Card was received, but none was sent, will be selected. If you want the QSO's for all Home QTH's, you would select each of the four Home QTH's shown in the list. The same logic applies to all selection fields.
Once you have set the selection arguments, press the Continue button – this opens the following two windows:
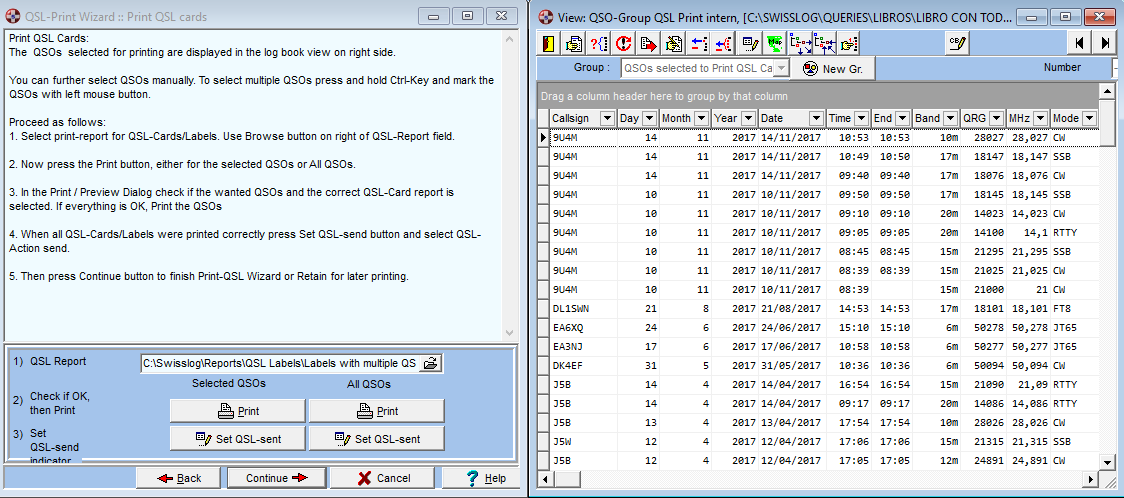
The above image shows two windows that will open together. In the window on the right, you will see the QSO's you have selected. These QSO's are automatically put into a (internal) QSO Group. Therefore, the right window is actually a normal QSO-Group View showing the QSO's selected to Print QSL Cards. To avoid errors you cannot change this QSO group. However, you can select specific QSO's if you only want to print those QSO's.
On the left side of the screen, there's a brief set of instructions and the control window. These controls allow you to perform the following functions:
Select the report template for the QSL card in the field QSL Report. You can browse the directories by pressing the button on the right hand side of the field. You can overwrite this selection later in the Print / Preview dialog if desired.
Open the Print / Preview dialog either for all QSO's in the group or the QSO you have selected in the view by pressing the corresponding Print button.
Set the QSL sent indicator for the QSO's just printed by pressing the corresponding Set QSL-sent button.
To print the QSL cards press the Print button
This opens the Print / Preview Dialog with the selected QSO's as the active data source and the QSL Report as active report. For more information please read Print / Preview Dialog.
When the QSL cards or QSL labels have been successfully printed, you should set the QSL-Sent indicator by pressing the Set QSL-sent button. This is an important step and should not be overlooked.
When your ready, press the Continue button – this brings you to the final dialog of the wizard:
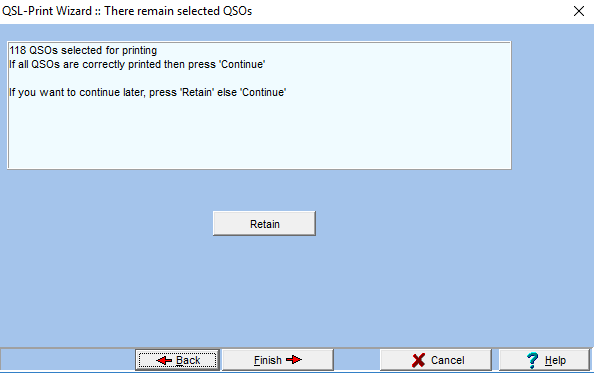
At this point, you can select whether you keep the selection or clear it. You should keep the selection it if you have not yet set the QSL-sent indicator. Remember, the selected QSO's are stored in an internal QSO-Group QSO's selected to Print QSL Cards.
Press the Retain button to retain the selection.
Press the Finish button to clear the selection.
It's also possible to print QSL cards from within any view that allows you to call the Print / Preview Dialog. You are then responsible for setting the QSL-sent indicator correctly when you're finished. The Logbook views contain functions to set the QSL-sent indicator – you can select them from the Functions and the pop-up menu.
To print QSL Cards without using the QSL card Wizard complete the following steps:
Select the QSO's with one of the filtering or selection functions available in the logbook view
Call the Print / Preview Dialog
Print the QSL cards
Set the QSL-sent indicator for the printed QSO's (function available in the logbook view)
To print a QSL card immediately after you've entered the QSO complete the following steps:
Save the QSO
Select the New QSO's page in the QSO Entry window
Select the first QSO in the list (this should be the one you just saved)
Right-click with the mouse and select Print selected QSO from the
pop-up menu
This opens the Print / Preview Dialog
Print the QSL card
To set the QSL-Sent indicator
Double-click on the QSO in the list to edit it
Change to the QSL-Info page and set the QSL-sent and QSL-Action
Press the Save button
Copyright © 2004 SWISSLOG
Last modified: 01 jun. 2018